Data Channel 共享照片(七)
你会学到什么
在这一步中,您将学习如何:
- 拍摄一张照片,并画布元素从中获取数据。
- 与远程用户交换图像数据。
此步骤的完整版本位于step-06文件夹中。
工作原理
在之前,您学习了如何使用 RTCDataChannel 交换文本消息。
这一步可以共享整个文件:在这个例子中,通过getUserMedia()获取照片。
这一步的核心部分如下:
- 建立数据通道。 请注意,在此步骤中不要将任何媒体流添加到对等连接。
-
使用 getUserMedia() 捕获用户网络摄像头的视频流:
-
当用户单击“Snap”按钮时,从视频流获取快照(视频帧)并将其显示在画布元素中:
var photo = document.getElementById('photo');
var photoContext = photo.getContext('2d');

function snapPhoto() {
    photoContext.drawImage(video, 0, 0, photo.width, photo.height);
    show(photo, sendBtn);
}
- 当用户单击“send”按钮时,将图像转换为字节并通过数据通道发送:
function sendPhoto() {
    // Split data channel message in chunks of this byte length.
    var CHUNK_LEN = 64000;
    var img = photoContext.getImageData(0, 0, photoContextW, photoContextH),
    len = img.data.byteLength,
    n = len / CHUNK_LEN | 0;

    console.log('Sending a total of ' + len + ' byte(s)');
    dataChannel.send(len);

    // split the photo and send in chunks of about 64KB
    for (var i = 0; i < n; i++) {
    var start = i * CHUNK_LEN,
        end = (i + 1) * CHUNK_LEN;
    console.log(start + ' - ' + (end - 1));
    dataChannel.send(img.data.subarray(start, end));
    }

    // send the reminder, if any
    if (len % CHUNK_LEN) {
    console.log('last ' + len % CHUNK_LEN + ' byte(s)');
    dataChannel.send(img.data.subarray(n * CHUNK_LEN));
    }
}
- 接收方将数据通道的消息字节转换成图像并将图像显示给用户:
function receiveDataChromeFactory() {
    var buf, count;

    return function onmessage(event) {
    if (typeof event.data === 'string') {
        buf = window.buf = new Uint8ClampedArray(parseInt(event.data));
        count = 0;
        console.log('Expecting a total of ' + buf.byteLength + ' bytes');
        return;
    }

    var data = new Uint8ClampedArray(event.data);
    buf.set(data, count);

    count += data.byteLength;
    console.log('count: ' + count);

    if (count === buf.byteLength) {
        // we're done: all data chunks have been received
        console.log('Done. Rendering photo.');
        renderPhoto(buf);
    }
    };
}

function renderPhoto(data) {
    var canvas = document.createElement('canvas');
    canvas.width = photoContextW;
    canvas.height = photoContextH;
    canvas.classList.add('incomingPhoto');
    // trail is the element holding the incoming images
    trail.insertBefore(canvas, trail.firstChild);

    var context = canvas.getContext('2d');
    var img = context.createImageData(photoContextW, photoContextH);
    img.data.set(data);
    context.putImageData(img, 0, 0);
}
获取代码
将工作文件夹的内容替换为步骤06的内容。 你的index.html文件现在应该看起来像这样:
<!DOCTYPE html>
<html>
<head>
<title>Realtime communication with WebRTC</title>
<link rel="stylesheet" href="/css/main.css" />
</head>
<body>
<h1>Realtime communication with WebRTC</h1>
<h2>
<span>Room URL: </span><span id="url">...</span>
</h2>
<div id="videoCanvas">
<video id="camera" autoplay></video>
<canvas id="photo"></canvas>
</div>
<div id="buttons">
<button id="snap">Snap</button><span> then </span><button id="send">Send</button>
<span> or </span>
<button id="snapAndSend">Snap & Send</button>
</div>
<div id="incoming">
<h2>Incoming photos</h2>
<div id="trail"></div>
</div>
<script src="/socket.io/socket.io.js"></script>
<script src="js/lib/adapter.js"></script>
<script src="js/main.js"></script>
</body>
</html>
如果您的Node.js服务器没有运行,请从您的工作目录调用以下命令来启动它:
确保index.js文件中使用的是实现http://Socket.IO - 如果你做了修改,记得重新启动你的Node.js服务器。)
如有必要,点击允许按钮,允许应用程序使用您的摄像头。
该应用程序将创建一个随机的房间ID,并将该ID添加到该URL。 在浏览器新的选项卡或窗口中打开网址。
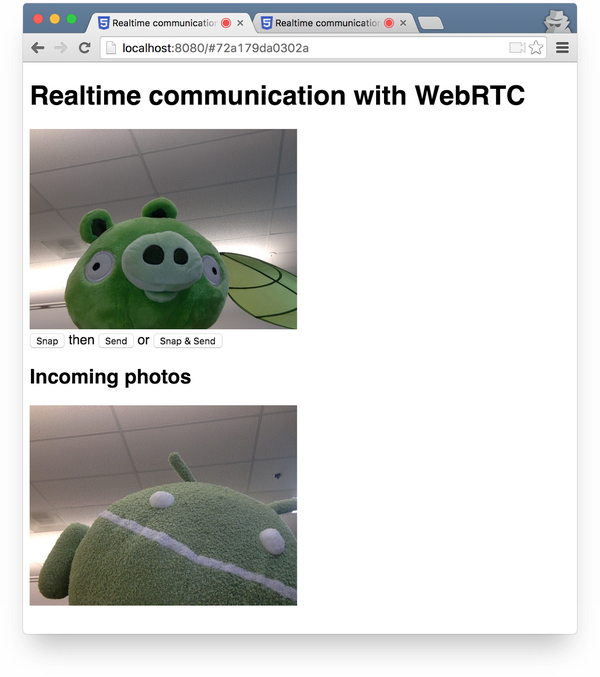
点击 Snap & Send 按钮,然后查看页面底部的“传入”区域。 该应用程序在tab之间传输照片。
您应该看到如下所示:
知识扩展
- 假如要共享任何类型的文件,怎样改变代码?
了解更多
- The MediaStream Image Capture API: 用于拍摄照片和控制相机的API - 即将推出到您附近的浏览器!
- MediaRecorder API, 用于录制音频和视频:demo, documentation。
你学到了什么
- 如何将照片显示到画布元素并从中获取数据。
- 如何与远程用户交换数据。
此步骤的完整版本位于step-06文件夹中。